 こまったさん
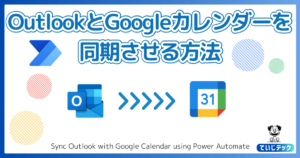
Outlookの予定をGoogleカレンダーにも同期させたい
それならPower Automateで実現する方法を解説します
- Outlook予定をGoogleカレンダーに同期させる方法が分かる
| コネクタ | アクション |
|---|---|
| コントロール | 条件 |
| コントロール | 終了 |
| データ操作 | アレイのフィルター処理 |
| Googleカレンダー | カレンダーのイベントの一覧を表示する |
| Googleカレンダー | イベントの削除 |
| Googleカレンダー | イベントの更新 |
| Googleカレンダー | イベントの作成 |
| Content Conversion | Htmlからテキスト(プレビュー) |
MicrosoftのOutlookは、その高機能さや他のOfficeアプリケーションとのパワフルな連携によりビジネスシーンでとても多くの企業で利用されています。
ただ、その一方でプライベートでは完全無料なGoogleカレンダーを使っているという方もよく見かけます。
その中で時々耳にするのが、Outlookの予定を自分のGoogleカレンダーにも同期させて、仕事をしていないときにも予定を確認できるようにしたい、というものです。
今回はそのような方に向けて、Power Automateを使ってOutlook予定をGoogleカレンダーに同期させる方法を解説します。
今回解説するフローはOutlook→Googleカレンダーの一方通行のフローになります。
ただ、仕事とプライベートの境界線をはっきりさせるという意味でも、プライベート予定を仕事用Outlookに持ち込むことは得策ではないと考えていますので、このフローでも十分役に立つはずです。
是非ご参考にしてみてください。
Power Automateをまだ良く知らないという方はこちら
今回作成するフローの全体像
今回作成するフローの全体像はこちらです。
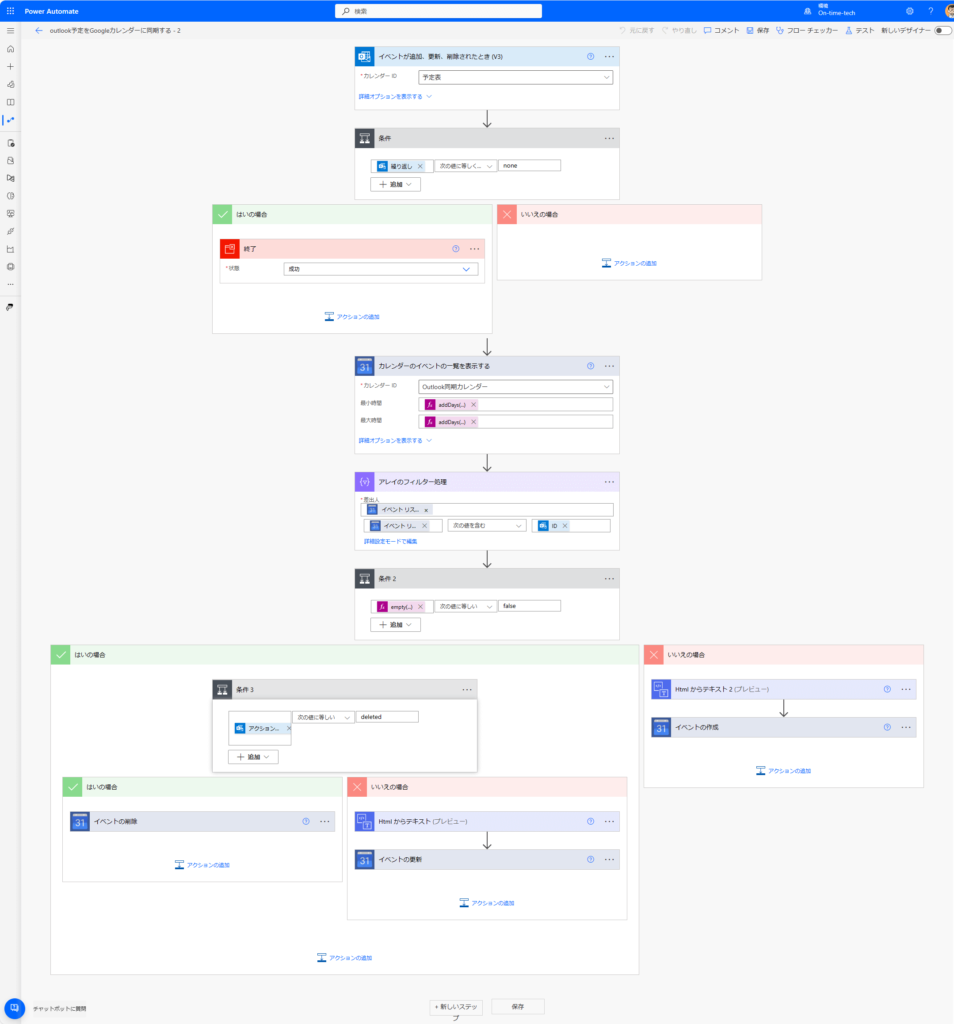
流れは大きく6ステップになります。
- Outlookイベント追加、更新、削除をトリガーにする
- 繰り返し予定を除外する
- Googleカレンダーのイベント一覧を取得する
- トリガーになったOutlookイベントがGoogleカレンダーに存在するかどうか確認する
- 存在している場合、削除もしくは更新をする
- 存在していない場合、新規登録する
分岐が多く分かりづらいかもしれませんが、次章からの解説通りに進めれば15分ほどで作成できますよ!
Power Automateフローの作成
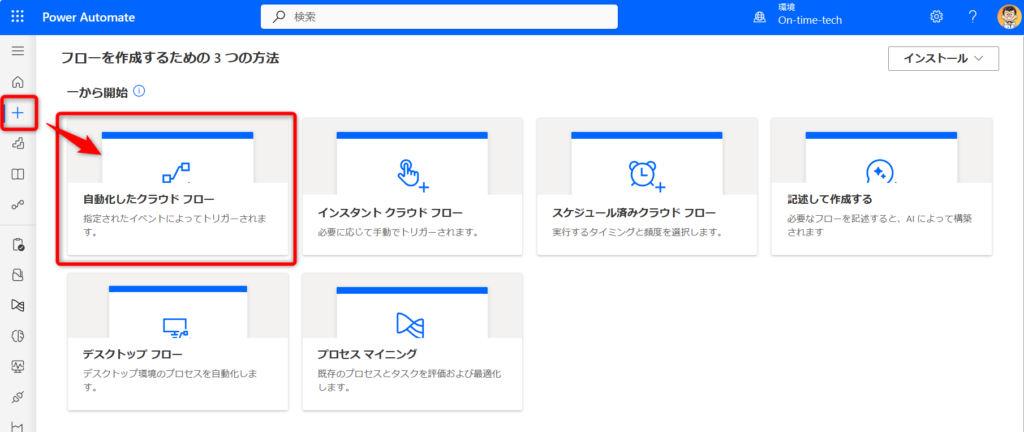
▼トップ画面から「自動化したクラウドフロー」を選択
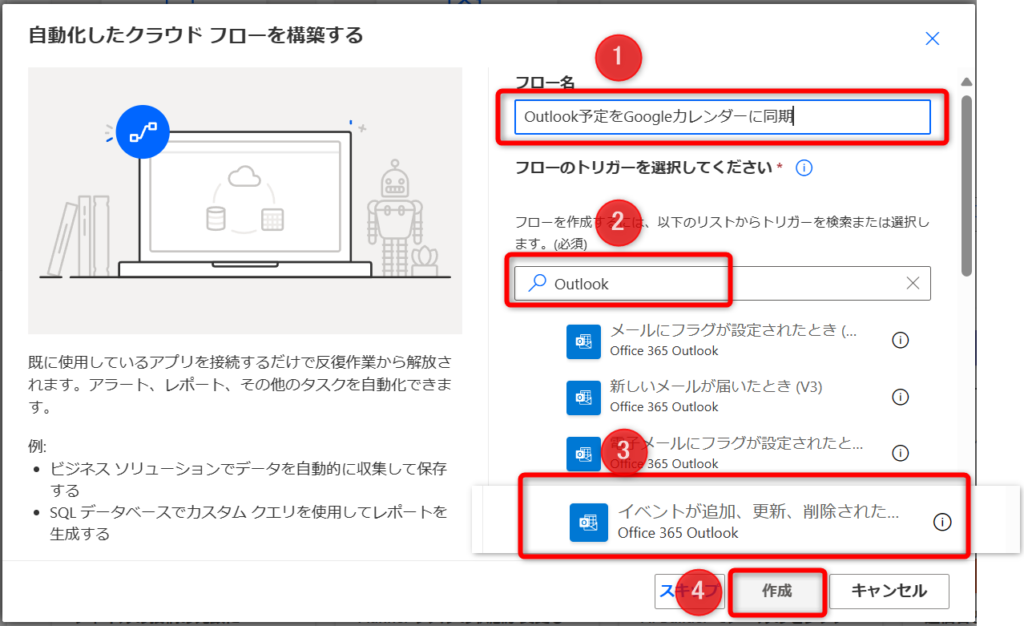
▼任意のフロー名を付けて、Outlookトリガー「イベントが追加、更新、削除された時」を選択し作成をクリック
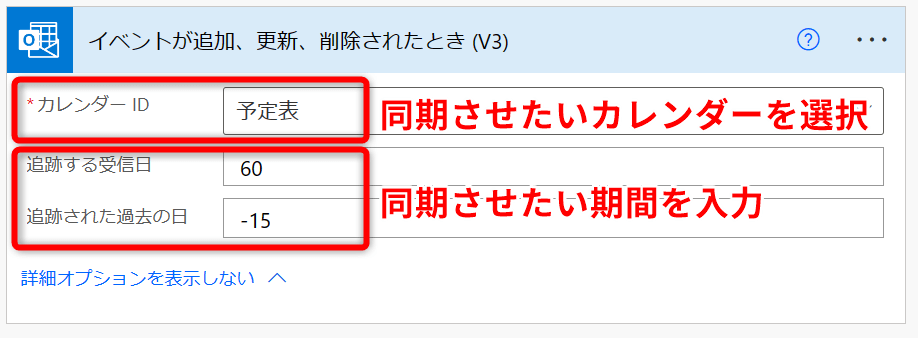
▼同期させたいOutlookカレンダー、同期させたい期間を設定します
| カレンダーID | 予定表 |
| 追跡する受信日 | 60 |
| 追跡された過去の日 | -15 |
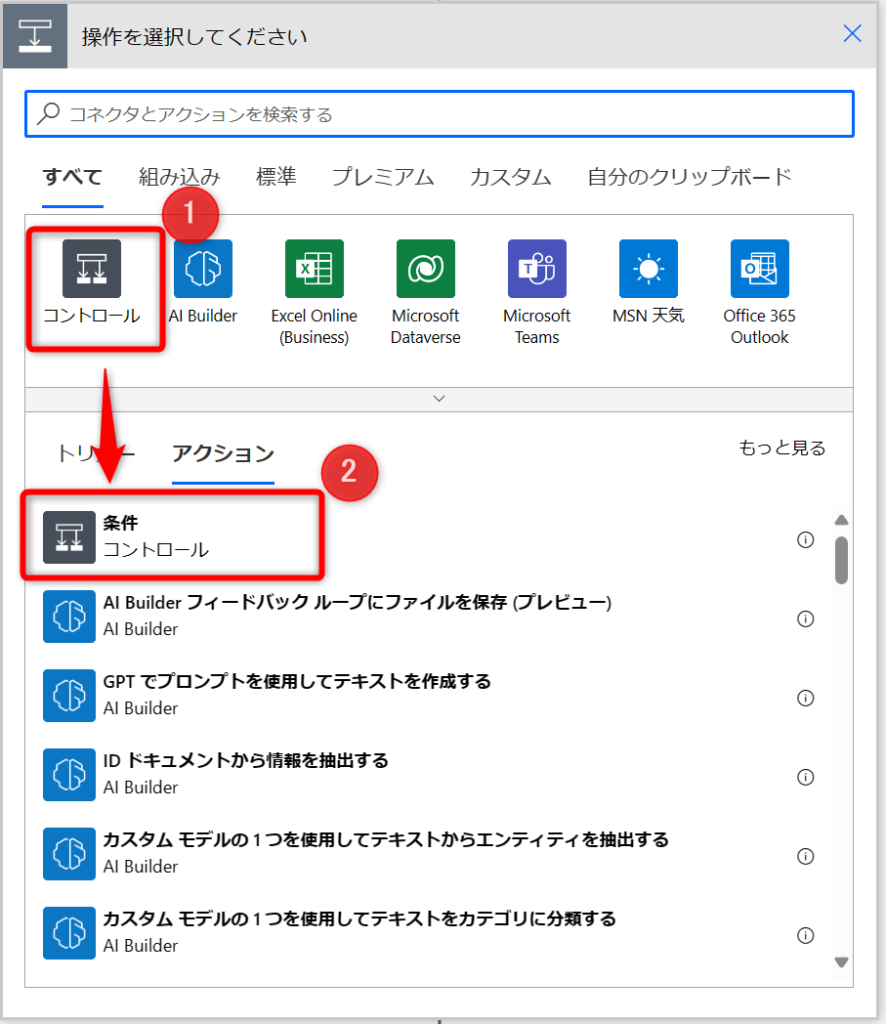
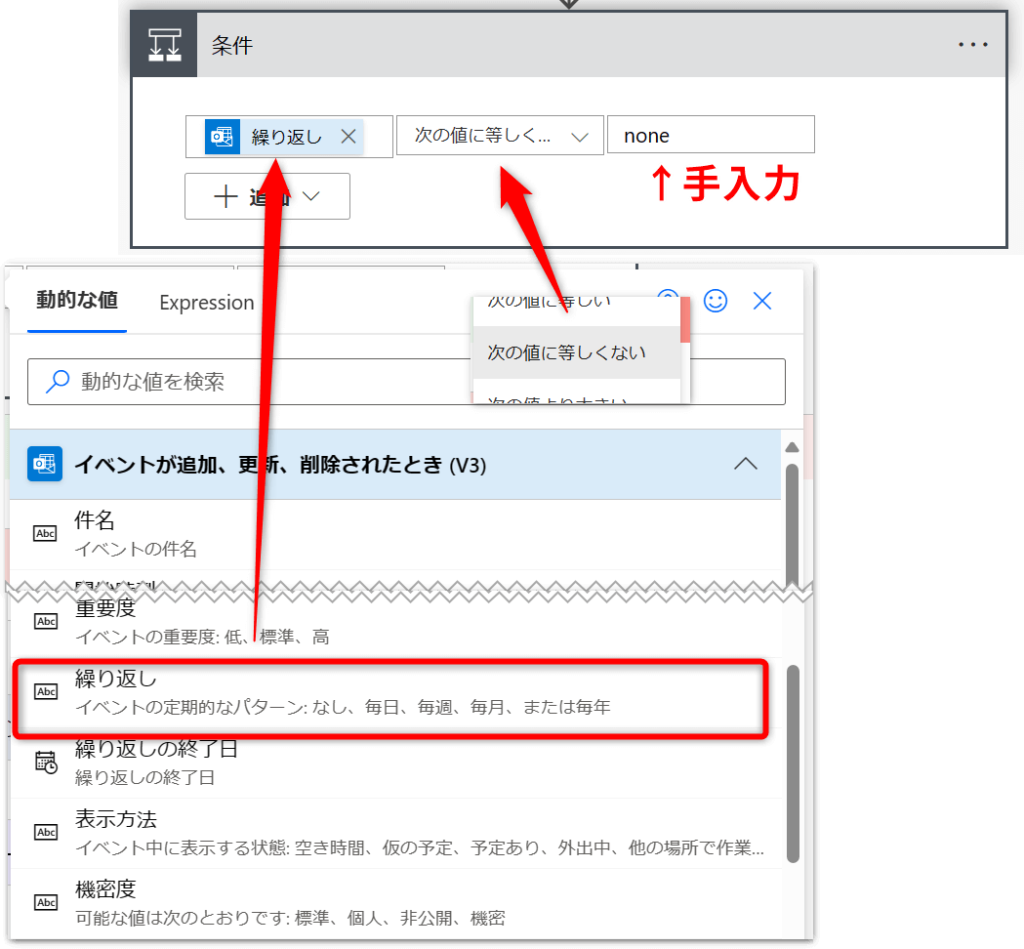
▼「コントロール」→「条件」を追加
▼Outlookで設定可能な「繰り返しの予定」はPower Automateで正しく処理がされないため、ここで除外するように設定をします。
| 左辺 | Outlook 繰り返し |
| 中央 | 次の値に等しくない |
| 右辺 | none (手入力) |
▼「はいの場合」=「繰り返しの予定」ということなので、「終了」アクションを”成功”として追加します。
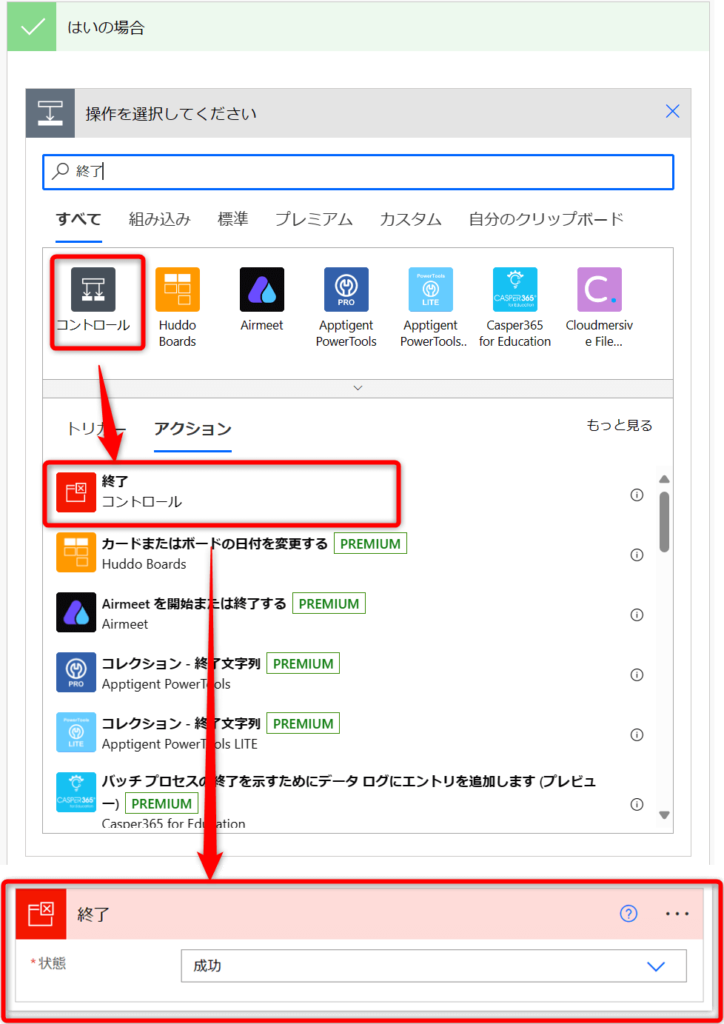
 てじまる
てじまる「いいえの場合」にはアクションを追加せず次に進みましょう
▼Googleカレンダーコネクタの「カレンダーのイベントの一覧を表示する」アクションを追加します。
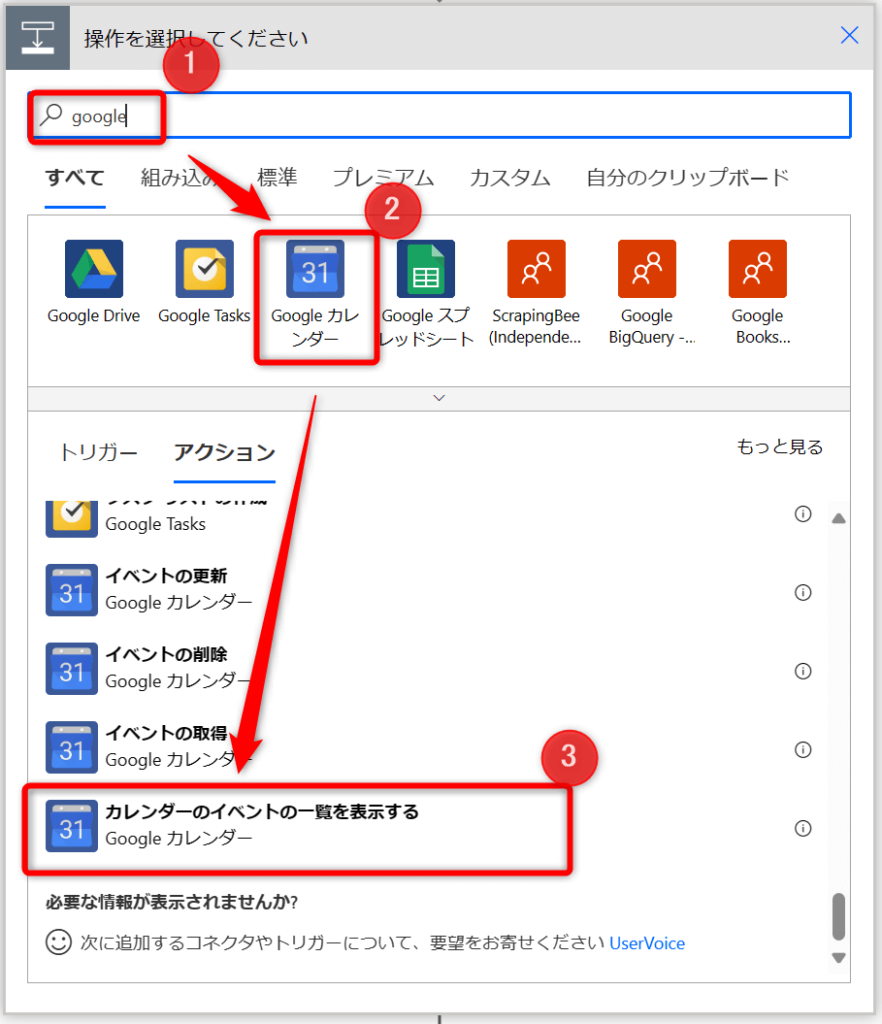
▼以下の通りプロパティを入力します。
| カレンダーID | 予定表 |
| 最小時間 | addDay(utcNow(), -15) |
| 最大時間 | addDay(utcNow(), 60) |
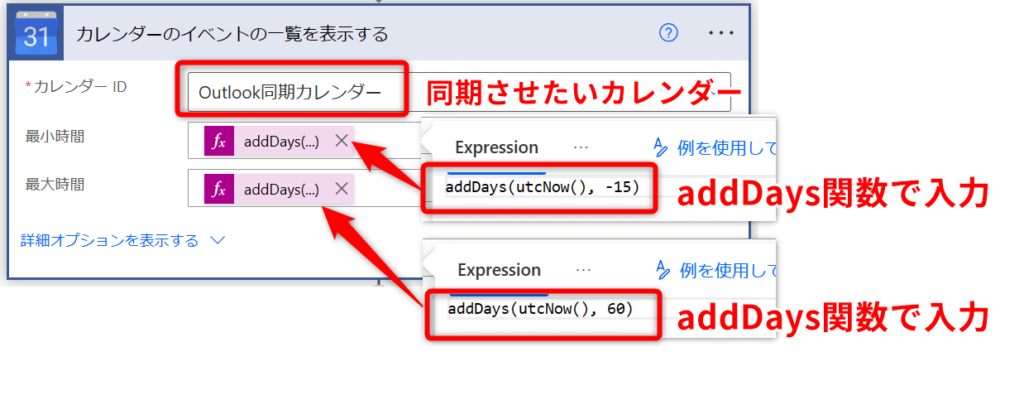
ここでは、最小時間がOutlookトリガーで設定した「追跡された過去の日」と、最大時間が「追跡する受信日」と合わせています。
ここで範囲を広げることで、だいぶ先もしくは前の予定までカバーできますが、あまり広げすぎると処理が遅くなってしまうので注意しましょう。
ここで、トリガーになったOutlookイベントが既にGoogleカレンダーに存在しているかを確認する準備をします。
▼「データ操作」→「アレイのフィルター処理」を追加する
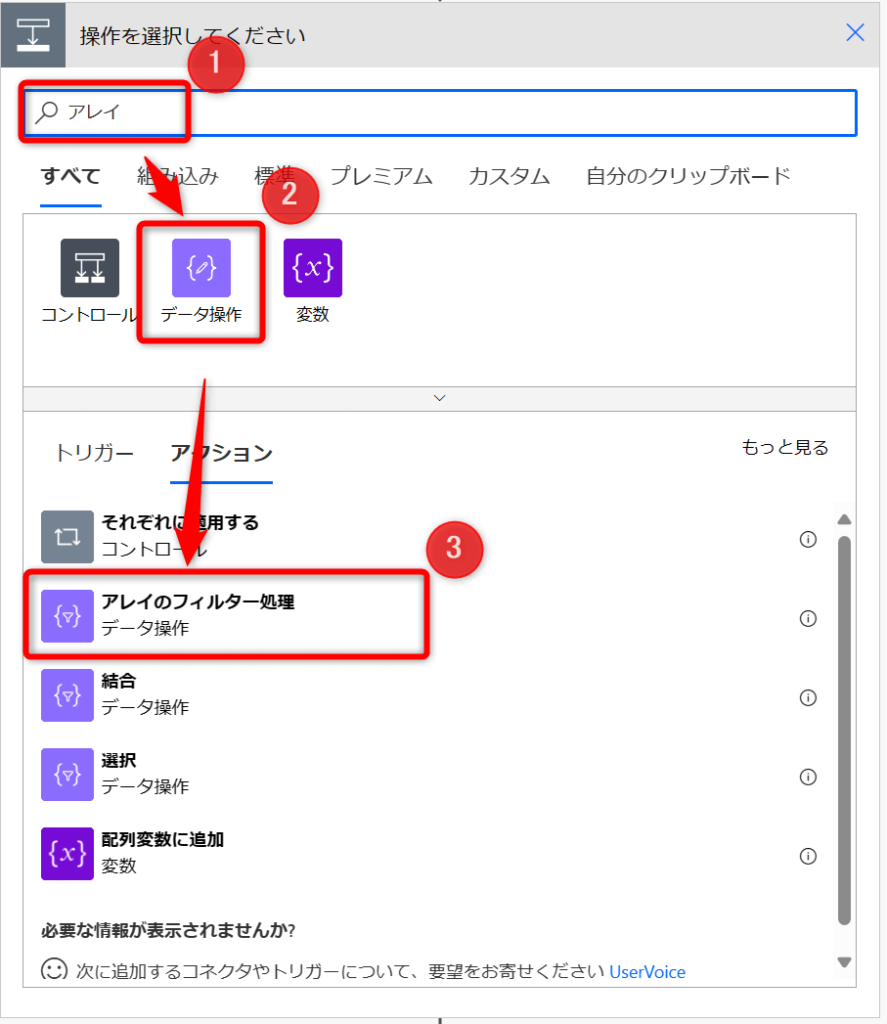
▼プロパティを次の通り入力します
| 差出人 | Googleカレンダー イベントリストアイテム |
| 左辺 | Googleカレンダー イベントリスト イベント説明 |
| 中央 | 次の値を含む |
| 右辺 | Outlook ID |
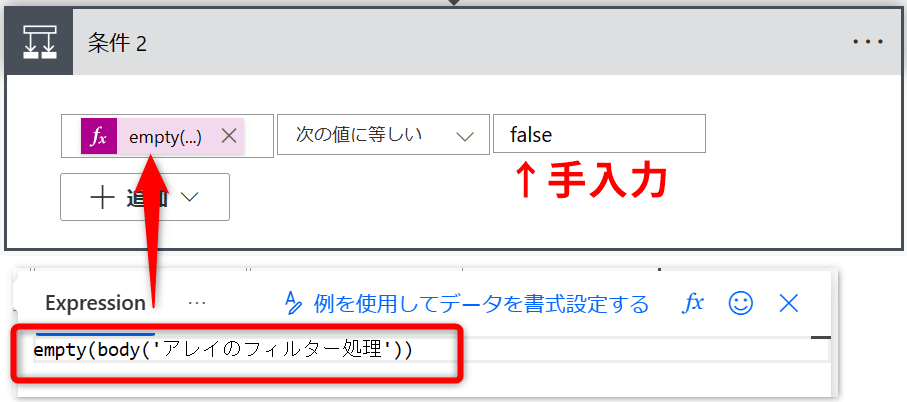
ここで、先程の「アレイのフィルター処理」アクションの結果をもとに、Googleカレンダーに既にイベントがあるかどうか判定します。
▼「コントロール」→「条件」アクションを追加します
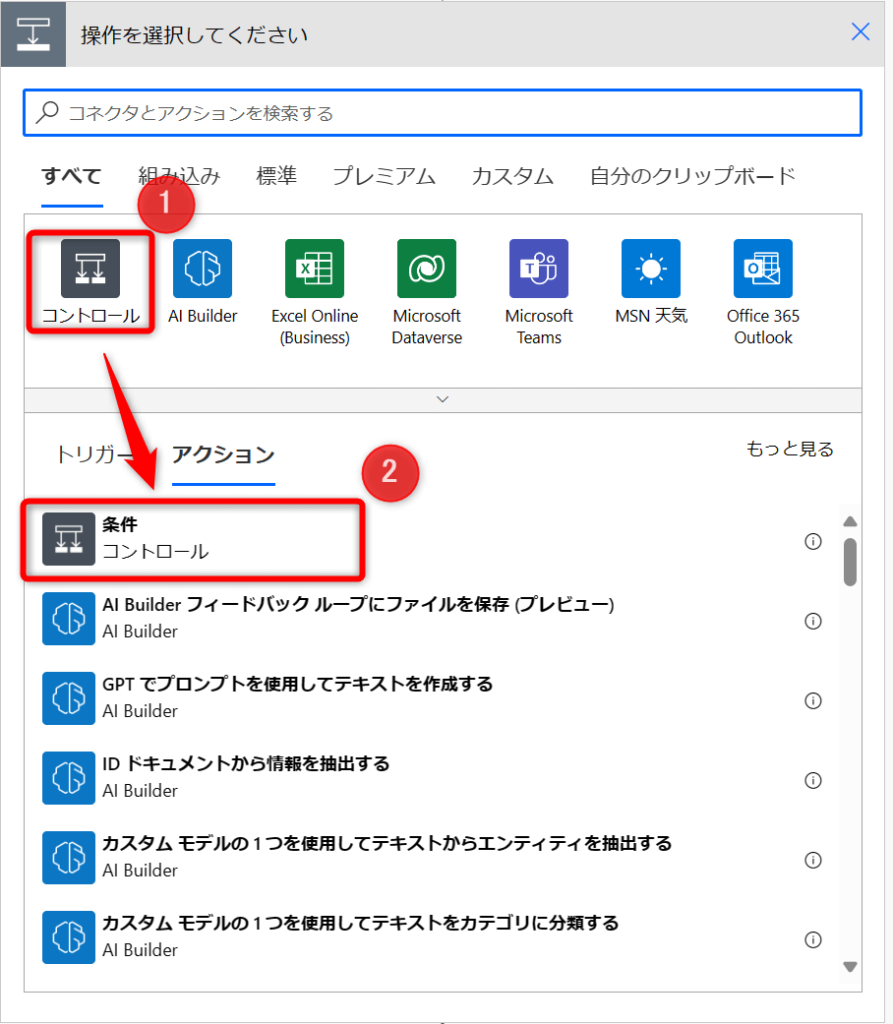
▼次の通りプロパティを入力します
| 左辺 | empty('アレイのフィルター処理') |
| 中央 | 次の値に等しい |
| 右辺 | false (手入力) |
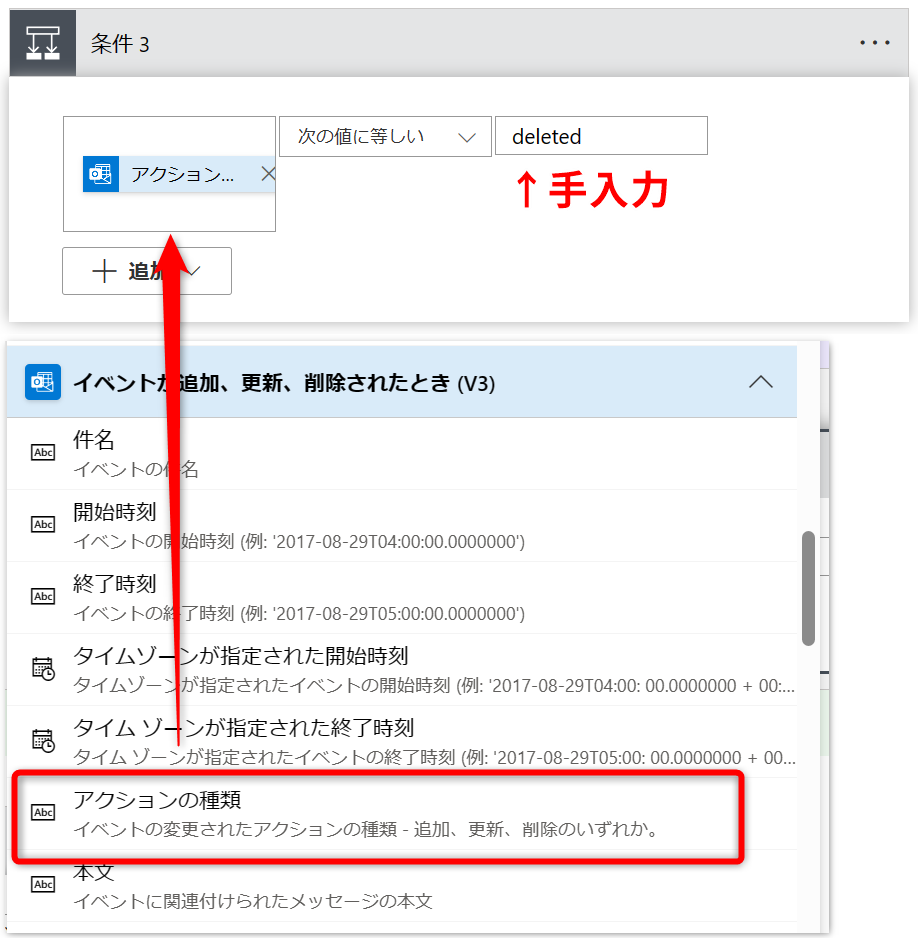
「はいの場合」=「更新もしくは削除」となるので、さらにここで「更新」or「削除」の分岐を作ります。
▼「削除」→「はいの場合」、「更新」→「いいえの場合」とするため次の通り設定します。
| 左辺 | Outlook アクションの種類 |
| 中央 | 次の値に等しい |
| 右辺 | deleted(手入力) |
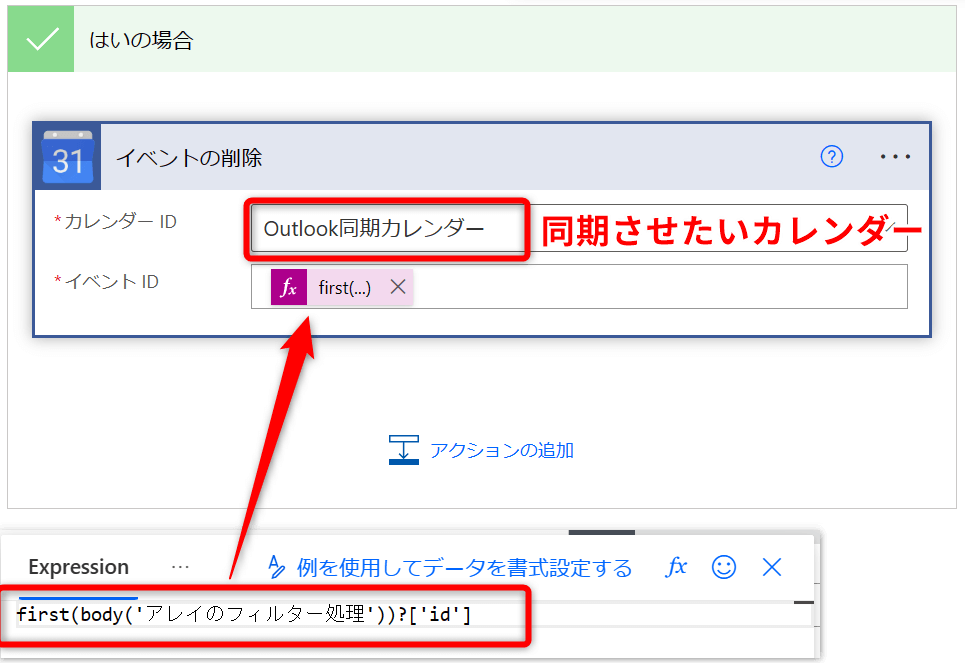
「はいの場合」はOutlook側のイベントが削除された時なので、Googleカレンダー側のイベントも削除するよう設定します。
| カレンダーID | 予定表 |
| イベントID | first(body(’アレイのフィルター処理’))?[’id’] |
「いいえの場合」はOutlook側のイベントが更新された時なので、Googleカレンダー側も更新します。
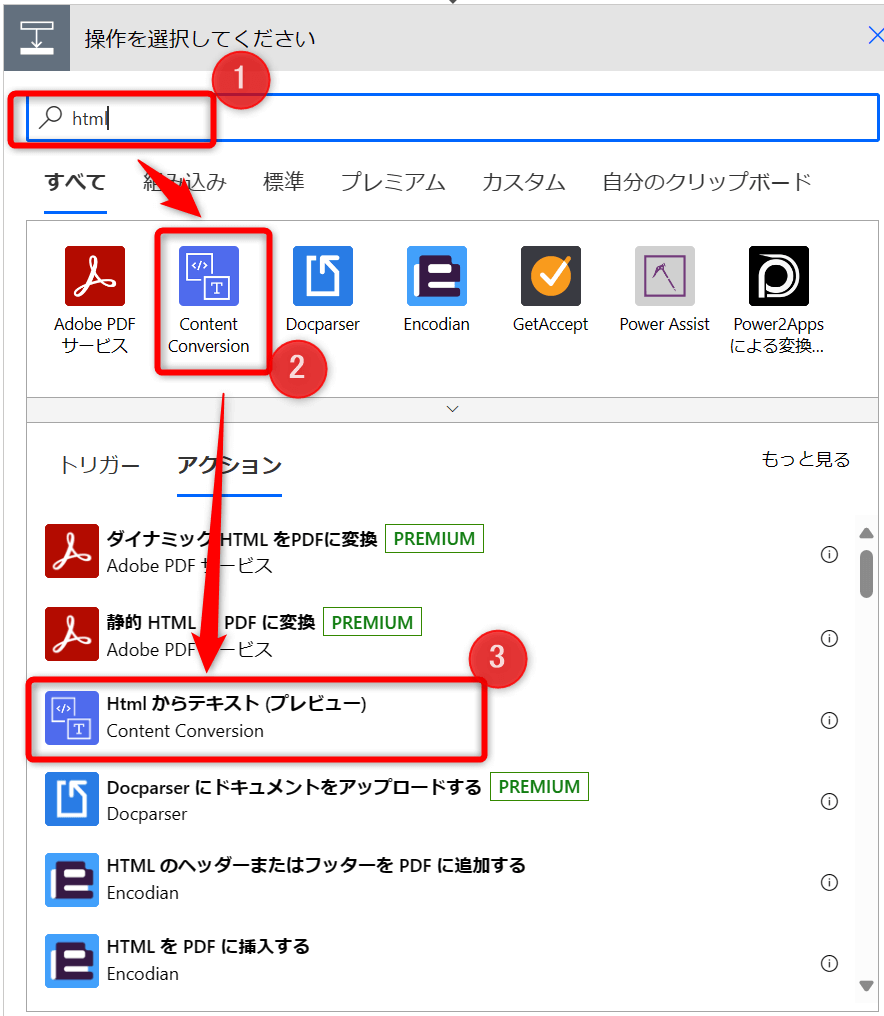
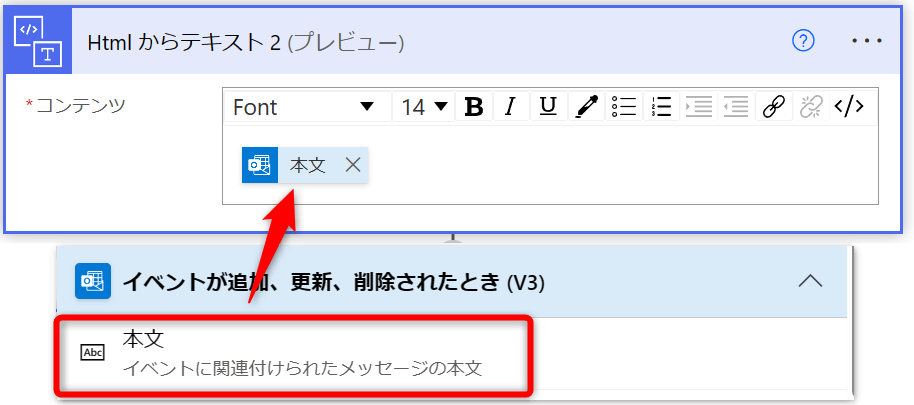
Outlook予定がHTML形式で登録されていると文字化けする不具合が発生するため、その回避するためプレーンテキストに変換します。
▼”html”で検索し「Content Conversion」→「Htmlからテキスト(プレビュー)」を選択します
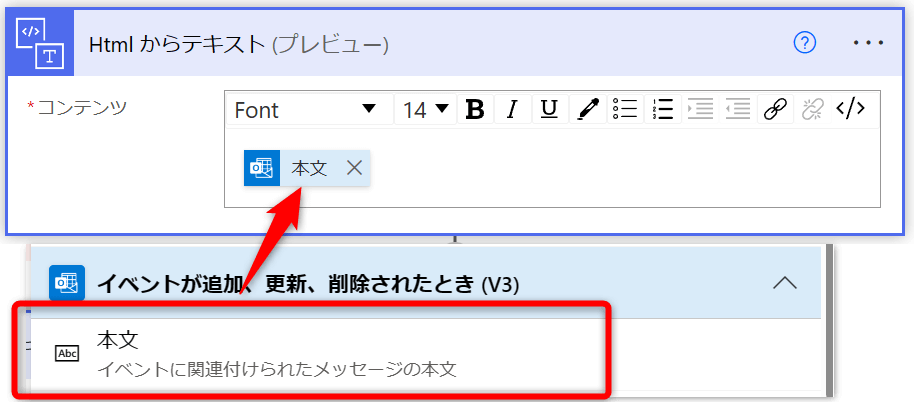
▼コンテンツにOutlookトリガーの動的な値「本文」を追加します
| コンテンツ | Outlook 本文 |
先程のプレーンテキストを使って、次の通り更新アクションを設定します。
▼「Googleカレンダー」→「イベントの更新」を選択し、次の通り各プロパティを入力します
| カレンダーID | 予定表 |
| イベントID | first(body(’アレイのフィルター処理’))?[’id’] |
| タイトル | Outlook 件名 |
| 開始時刻 | Outlook 開始時刻 z |
| 終了時刻 | Outlook 終了時刻 z |
| 説明 | HTMLからテキスト プレーンテキストコンテンツ ID: Outlook ID |
| 場所 | Outlook 場所 |
| 終日 | Outlook 終日イベントですか? |
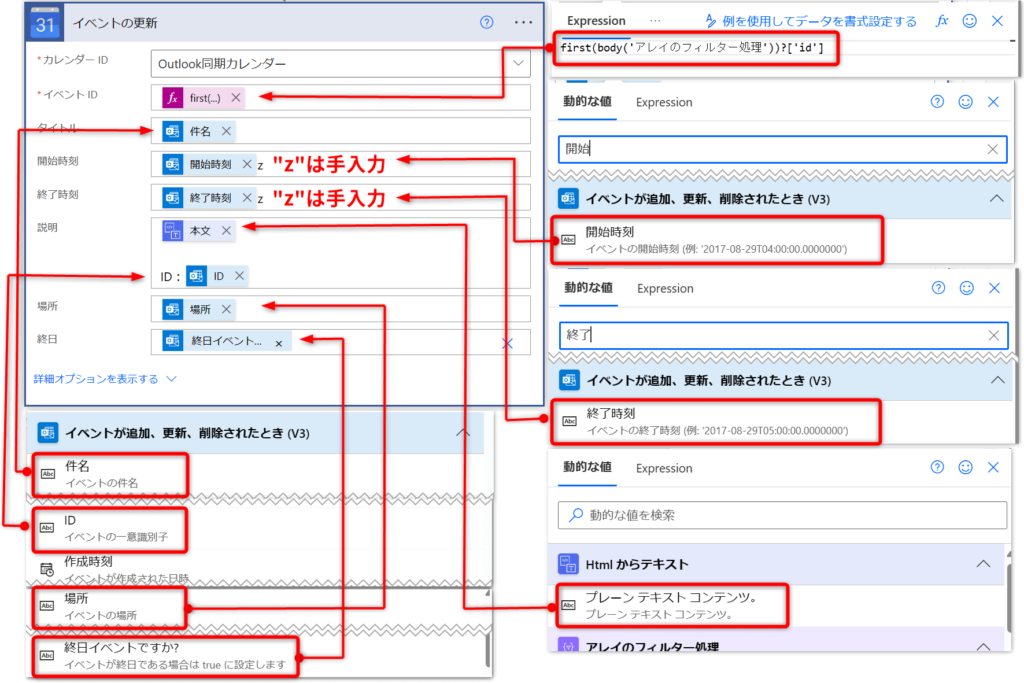
「開始時刻」「終了時刻」が動的な値に出てこない場合は、検索窓で検索すると出てくるはずです。
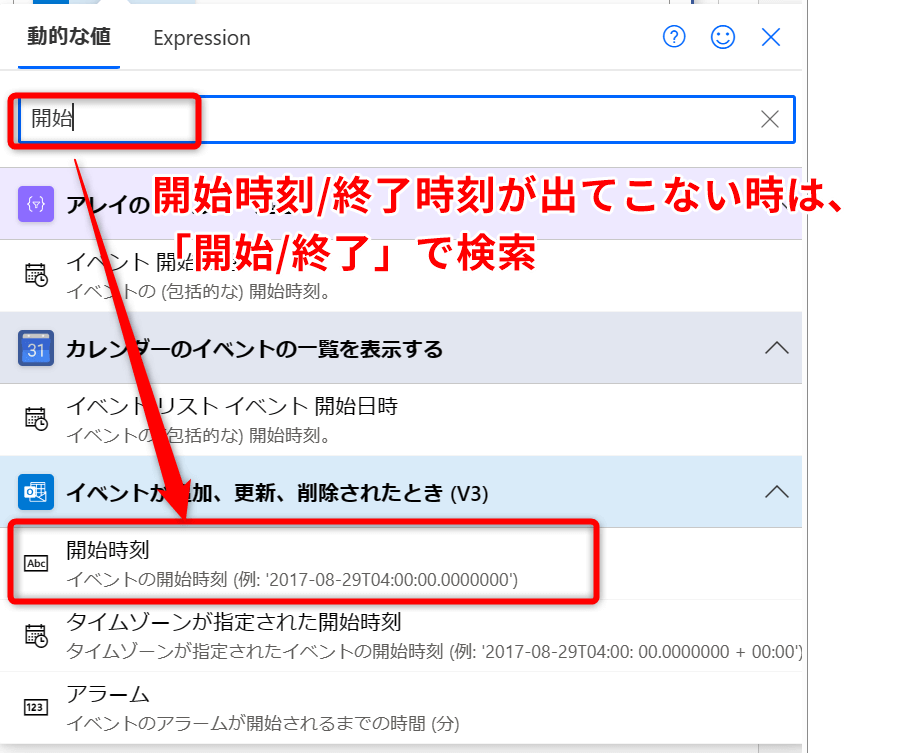
Power Automateのバグのようなもので、2024年4月時点もまだ発生します。
最後は、トリガーとなったOutlookイベントがGoogleカレンダーになかった場合、つまり新規イベントだった時のアクションです。
▼更新アクションと同じように、まずはHTML文字化け回避のアクションを追加します。
| コンテンツ | Outlook 本文 |
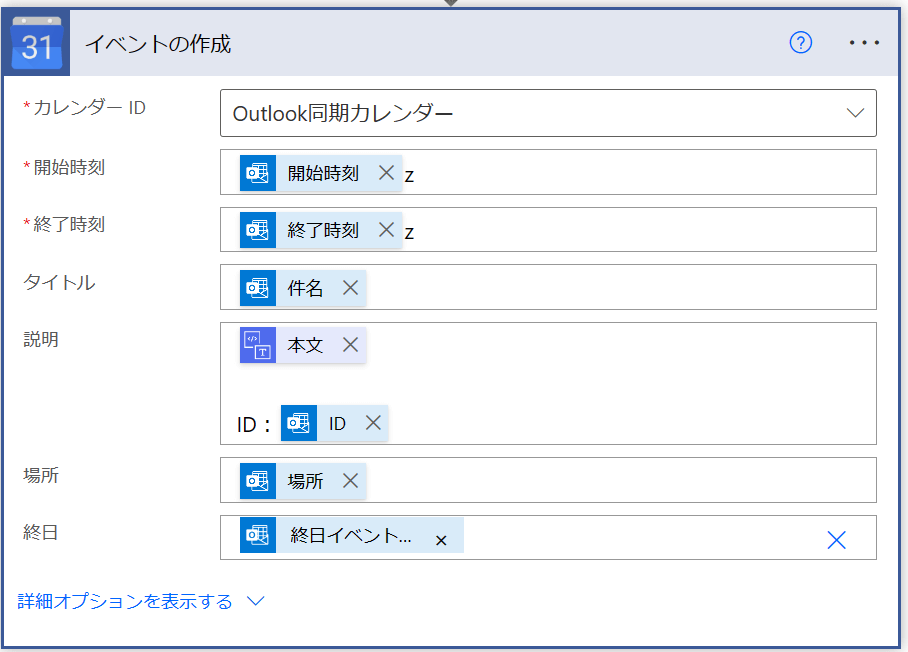
▼「Googleカレンダー」→「イベントの作成」を選択し、次の通り各プロパティを入力します
| カレンダーID | 予定表 |
| 開始時刻 | Outlook 開始時刻 z |
| 終了時刻 | Outlook 終了時刻 z |
| タイトル | Outlook 件名 |
| 説明 | HTMLからテキスト プレーンテキストコンテンツ ID: Outlook ID |
| 場所 | Outlook 場所 |
| 終日 | Outlook 終日イベントですか? |
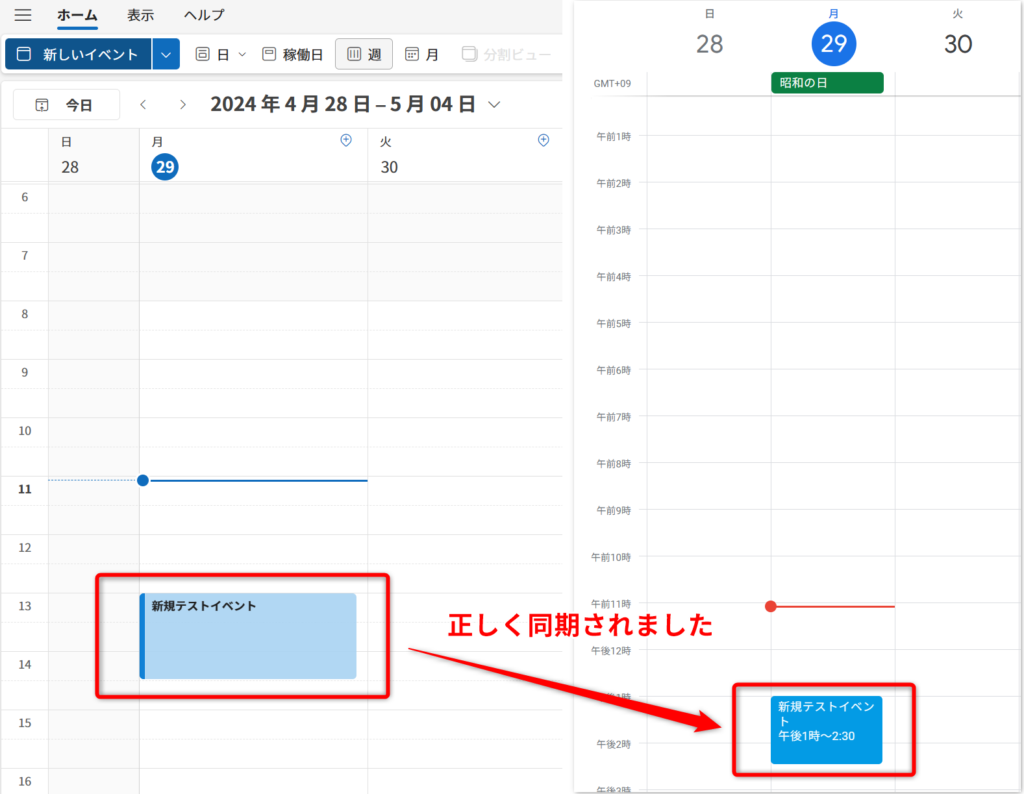
▼テストとして新規イベント追加しましたが、正しく同期されています。これで完成です。
ここまでお疲れ様でした!
まとめ:Outlook予定をGoogleカレンダーに同期させて業務効率化しよう
今回はPower Automateを使ってOutlook予定をGoogleカレンダーへ同期させるフローを解説しました。
会社でOutlook、プライベートではGoogleカレンダーを使っているという方も多いと思います。
複数のカレンダーを使うと、予定のダブルブッキングなど思わぬトラブルに繋がる可能性があります。
でも、会社ではGoogleカレンダーを使うことができないということも聞きます。
そのような時は、このフローを使ってみてください。
初心者の方にとっては少し難しく思えるかもしれませんが、この記事の手順に沿って一つずつ設定すれば、誰でも設定できます。
ぜひ、Power Automateをうまく活用して業務効率化をしていきましょう。
 てじまる
てじまるこのブログではPower Automateを始めとしたローコードツール、Microsoft365系ソフトの効率的な使い方など定時帰りに役立つ情報を発信しています。
参考になりましたら、ぜひブックマーク登録をお願いします!

定時帰り後の時間を有効活用する活動『てじ活』には副業ブログがおすすめ!
副業ブログには、自分の知識やスキルを活かして収入を得るチャンスがあります。さらに、ブログを書くことで日常の業務スキルも向上し、新しい分野への知識が広がりますよ!
コチラの記事もオススメ!


オススメのPower Automate教材はコチラ
Power Automateをもっと使いこなしたいという方はコチラの書籍がおすすめです!

▲これから自動化を学びたい方にぴったりの入門書です。PowerAutomateなどのウェブツールは日々進化しています。そのアップデートにより画面構成や用語など、UI自体に見直しが入ることがあります。数年前の書籍では、使われている画面や用語が自分のPC画面と若干違って戸惑うことがあります。その点、この書籍は2024年に発売されたばかりで安心です。

▲これからPower Automate Desktopを始めたい人にオススメの入門書です。基本的なところから実用的はフローの紹介まで幅広く書かれています。図解も多く最初の1冊にぴったり。自分も最初はこの書籍から入りました。PADの書籍選びに迷っているならこの書籍を激推します。

▲Power Automatedesktopをこれから学習する人にはこの書籍がオススメです。インプレス社の「できる」シリーズなので内容は間違いなし。イラストを多用しているので飽きずに最後まで読めます。しかも内容も初心者向けに丁寧に解説されているので、これ一冊でPower Automate Desktopの基礎はマスターできます。
ここで紹介している書籍は、20冊以上のPower Automate本を読んでいる運営者が、安心しておすすめできるものばかりです!